How This Idea Grabbed Me (Pun Intended)
The idea for this project came from exploring inverse kinematics for robotic manipulators. I wanted to control a robotic hand just by moving my own hand—seeing gestures replicated in real-time by a machine.
That's when the idea hit me—a gesture-controlled robotic hand that could mimic human movements. Not just a simple gripper, but a full anthropomorphic hand with five fingers, each with multiple degrees of freedom. The kind of project that would make my inner robotics nerd absolutely giddy.
The best part? I wanted to do it the right way. Not just slapping some servos together and calling it a day. I wanted proper kinematic analysis, stress testing, and real-time gesture recognition using computer vision. Because if you're going to build a robotic hand, you might as well give it a helping hand with some serious engineering.
What I Wanted This Hand To Do
The goal was ambitious but clear: create a robotic hand that could replicate human hand gestures in real-time using nothing but a camera and some clever software. The system needed to:
- Detect hand gestures using a USB camera and process them with OpenCV and MediaPipe
- Translate gestures to control signals that would drive servo motors
- Mimic finger movements accurately enough to perform basic grasping and pointing gestures
- Operate in real-time with minimal latency between gesture and robotic response
The applications were obvious: prosthetics, assistive robotics, human-robot interaction, and honestly? Just because it's cool. There's something magical about watching a machine mirror your movements—it's like having a robot twin that actually listens to you.
Mechanical Design – Palm, Fingers, Tendons
The Anatomy of a Robotic Hand
Designing a robotic hand that mimics human anatomy is no small feat. Each finger has three joints (proximal, middle, and distal), and the thumb has two. That's 14 degrees of freedom just for the fingers, not counting the wrist. For this project, I focused on creating a 3D-printed hand with servo-driven actuation.
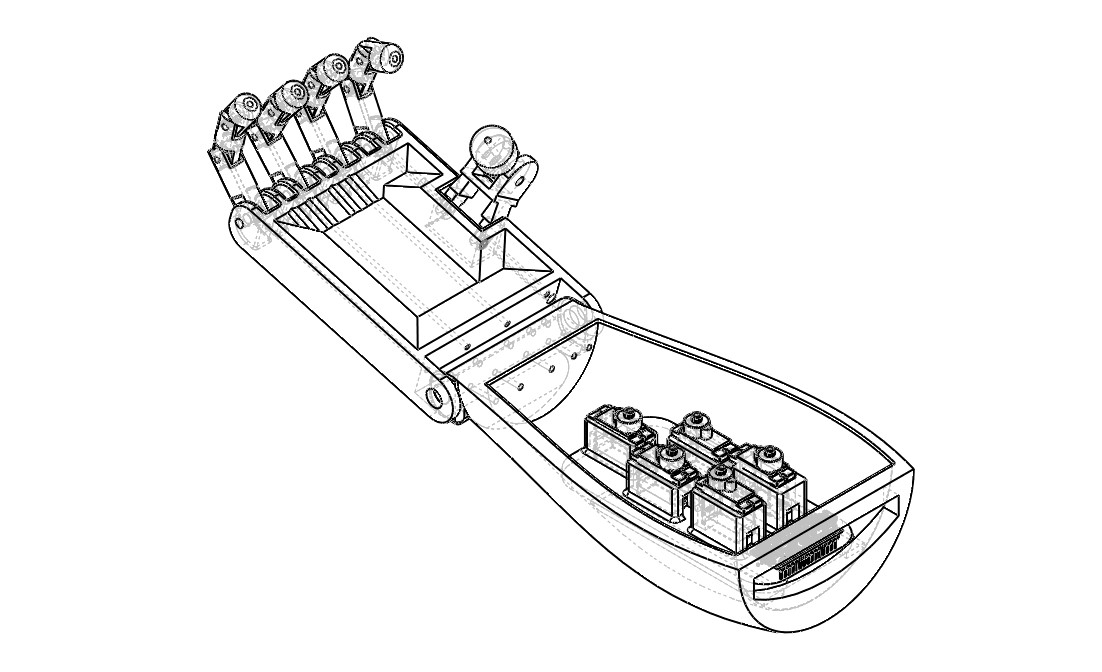
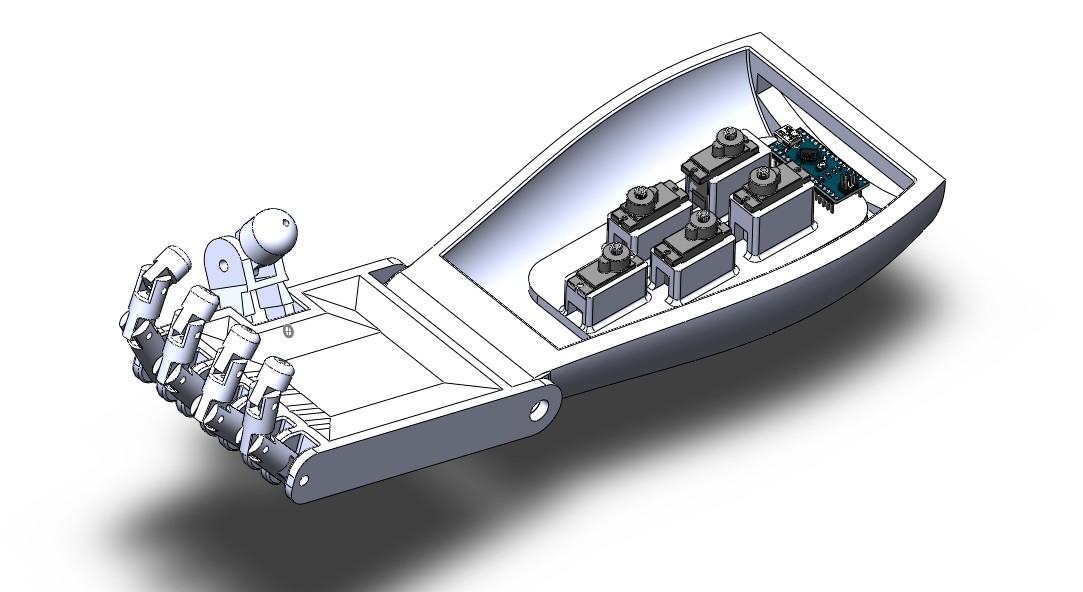
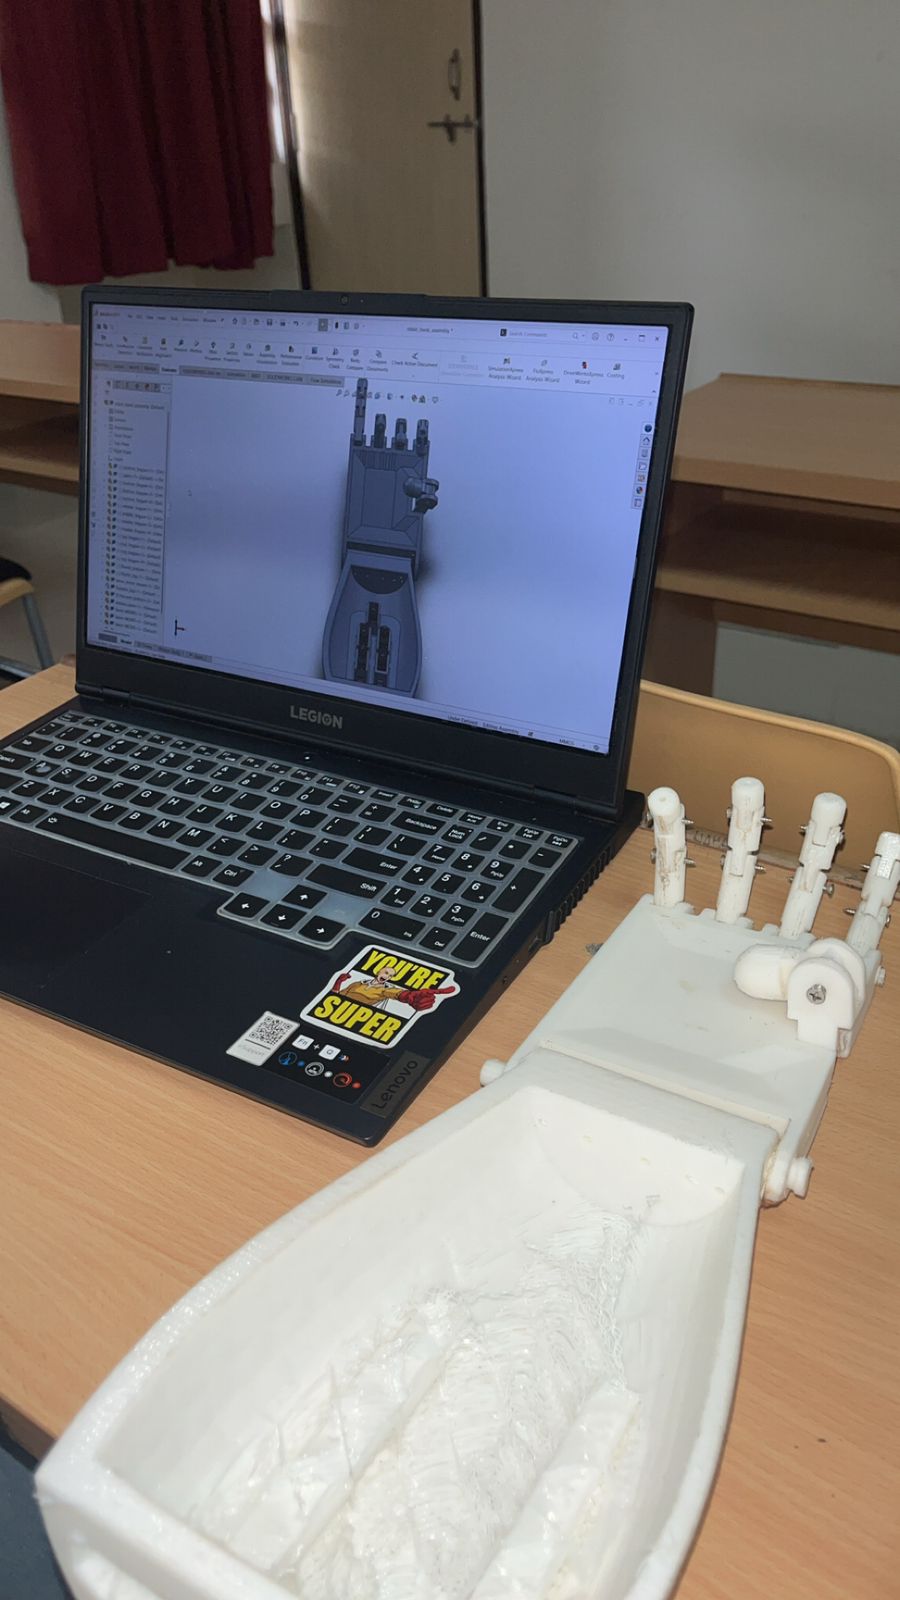
The design process started in SolidWorks, where I modeled each component:
- Palm structure: The foundation that houses all the servo motors
- Finger segments: Three segments per finger (bottom, middle, top) connected by revolute joints
- Thumb assembly: Two-segment thumb with its own actuation
- Servo mounts: Custom brackets to secure the motors within the palm
The beauty of 3D printing is that you can iterate quickly. I went through multiple design revisions, tweaking joint clearances, finger lengths, and mounting points until everything fit together like a well-oiled machine. Or, in this case, a well-printed machine.
The Tendon System
Here's where it gets interesting. Human hands use tendons to transmit force from muscles in the forearm to the fingers. For this robotic hand, I used a similar approach—nylon strings (acting as tendons) connected to servo motors. When a servo rotates, it pulls the tendon, which flexes the finger. Release the tension, and the finger extends back (thanks to elastic bands or return springs).
The challenge? Routing the tendons so they don't interfere with each other and ensuring smooth motion without binding. It took several iterations to get the routing right, but when it finally worked, watching those fingers curl and uncurl was pure satisfaction.
Actuation & Control – Giving Life to Fingers
Servo Motor Selection
I chose standard hobby servo motors for this project. Why? They're affordable, easy to control, and provide enough torque for finger actuation. Each finger gets its own servo, and the thumb gets one too. That's five servos total, all controlled via PWM signals from an Arduino Uno.
The servos are mounted inside the palm, with their output shafts connected to spools that wind the tendon strings. When the servo rotates, it winds the tendon, pulling the finger closed. Rotate it back, and the finger opens. Simple in concept, but getting the range of motion right required careful calibration.
Arduino Control System
The Arduino Uno acts as the brain of the operation. It receives gesture data from the Python/OpenCV system running on a computer, processes it, and sends PWM signals to each servo motor. The communication happens over serial (USB), which provides fast enough data transfer for real-time control.
The control code maps finger joint angles (extracted from MediaPipe landmarks) to servo positions. This mapping isn't trivial—human finger joints don't move in perfect linear relationships, and servo motors have their own limitations. I spent hours calibrating the mapping to get smooth, natural-looking finger movements.
The Gesture Recognition Pipeline
This is where the magic happens. The system uses MediaPipe Hands, Google's on-device hand tracking solution, which detects 21 key landmarks on the hand in real-time. These landmarks correspond to specific points: wrist, thumb joints, finger joints, fingertips, etc.
The Python script:
- Captures video frames from the USB camera
- Processes each frame through MediaPipe to detect hand landmarks
- Calculates joint angles from the landmark positions
- Maps these angles to servo positions
- Sends control commands to the Arduino via serial communication
The result? Real-time gesture replication with minimal latency. When I open my hand, the robotic hand opens. When I make a fist, it makes a fist. When I point, it points. It's like having a robot doppelgänger for your hand.
Materials, Fabrication & Prototyping Adventures
3D Printing: The Good, The Bad, and The Stringy
All the mechanical components were 3D printed using PLA (polylactic acid) filament. PLA is great for prototyping—it's cheap, easy to print, and strong enough for this application. The print settings mattered a lot: too much infill and the parts were heavy and slow to print; too little and they'd break under load.
I learned quickly that 3D printing is an art form. Layer adhesion, support structures, print orientation—all of these factors affect the final part quality. Some fingers came out perfect on the first try. Others... well, let's just say I got very familiar with my printer's "cancel print" button.
Post-processing was crucial. Each part needed sanding to remove layer lines, test-fitting to ensure proper clearances, and sometimes re-printing with adjusted tolerances. The joints especially needed careful attention—too tight and they'd bind, too loose and the fingers would wobble.
Material Choices and Trade-offs
I considered several materials:
- PLA: Easy to print, but can be brittle
- PETG: More flexible and durable, but trickier to print
- TPU: Super flexible, but difficult to get precise dimensions
For this prototype, PLA was the right choice. It's stiff enough to maintain finger shape under load, and the parts are lightweight, which reduces the torque requirements on the servos. For a production version, I'd probably go with PETG or even carbon fiber-reinforced filament for added strength.
Testing – Fingers Crossed 🤞
Kinematic Analysis: The Math Behind the Magic
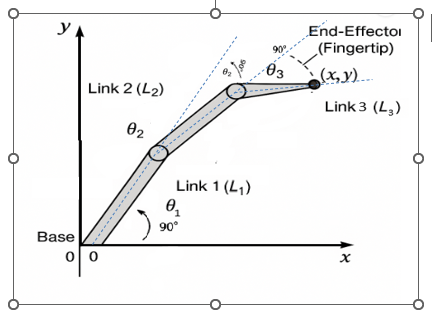
Before I could control the hand, I needed to understand its kinematics. Each finger is essentially a 3-link planar manipulator with three revolute joints. The challenge? Given a desired fingertip position, calculate the joint angles needed to reach it.
I derived the forward and inverse kinematics equations for a 3-link finger:
- Forward kinematics: Given joint angles (θ₁, θ₂, θ₃), calculate fingertip position (x, y)
- Inverse kinematics: Given desired fingertip position, calculate required joint angles
The constraints were important: each joint can only rotate 0° to 90°, similar to human finger joints. This limits the workspace but keeps the motion natural-looking.
The kinematic analysis wasn't just academic—it directly informed the control algorithm. By understanding the relationship between joint angles and fingertip position, I could create smoother, more accurate finger movements.
Stress Analysis: Will It Break?
Before committing to 3D printing, I ran stress analysis in SolidWorks Simulation. This Finite Element Analysis (FEA) helped identify potential failure points and optimize the design. I applied typical loads—like the force needed to grasp a lightweight object—and analyzed stress distribution.
The results showed that the finger segments could handle the expected loads, but some areas needed reinforcement. I thickened certain sections and adjusted the geometry to reduce stress concentrations. The analysis gave me confidence that the printed parts wouldn't fail during normal operation.
Gesture Recognition Testing
Testing the gesture recognition system was both fun and frustrating. Fun because watching the hand mirror my movements never got old. Frustrating because lighting conditions, camera angles, and hand positioning all affected accuracy.
I tested various gestures:
- Open hand: All fingers extended
- Closed fist: All fingers curled
- Pointing: Index finger extended, others curled
- Thumbs up: Thumb extended, others curled
- Pinch grasp: Thumb and index finger together
The system performed well under good lighting conditions, but struggled in low light or with complex backgrounds. I implemented image preprocessing techniques (brightness adjustment, contrast enhancement) to improve robustness.
Challenges — When the Hand Didn't Want to Cooperate
The Servo Synchronization Problem
One of the first major challenges was getting all five servos to move smoothly together. Initially, they'd move at slightly different speeds, causing jerky, unnatural-looking gestures. The solution? Implement a coordinated motion algorithm that calculates all servo positions simultaneously and moves them in sync.
I also discovered that servos have "dead zones" and non-linear response characteristics. The PWM signal to position mapping wasn't perfectly linear, so I had to create a calibration lookup table for each servo. Tedious? Yes. Necessary? Absolutely.
The Tendon Routing Nightmare
Routing five tendons through a compact palm without them tangling or interfering with each other was like solving a 3D puzzle. I went through multiple design iterations, trying different routing paths, before finding a solution that worked.
The breakthrough came when I realized I could use small pulleys and guides to route the tendons more efficiently. This reduced friction and made the finger movements smoother. Sometimes the best solutions come from stepping back and rethinking the problem.
Real-Time Processing Latency
The biggest challenge was minimizing latency between gesture detection and robotic response. The pipeline involves:
- Camera capture (~33ms for 30fps)
- MediaPipe processing (~10-20ms)
- Serial communication (~5-10ms)
- Servo response time (~50-100ms)
Total latency: around 100-150ms, which is acceptable for most gestures but noticeable for fast movements. I optimized the code, reduced unnecessary processing, and used efficient serial communication protocols to minimize delays.
Lighting and Background Sensitivity
MediaPipe works best with good lighting and a clean background. In dim lighting or cluttered backgrounds, hand detection became unreliable. I implemented adaptive thresholding and background subtraction techniques to improve robustness, but the system still works best in controlled environments.
When It Finally Worked – The Magical Moment™
After weeks of debugging, recalibrating, and re-printing parts, the moment of truth arrived. I positioned my hand in front of the camera, opened it slowly, and watched as the robotic hand mirrored my movement in real-time.
It was surreal. The fingers extended smoothly, the joints moved naturally, and the gesture was replicated with impressive accuracy. I tried a fist—it made a fist. I pointed—it pointed. I gave a thumbs up—it gave a thumbs up (though the thumb servo needed a bit more calibration).
That first successful gesture replication was pure joy. All the late nights, failed prints, and debugging sessions were worth it. I had created something that actually worked, and it felt amazing.
What I Learned as a Robotics Inventor Student
This project taught me more than I expected. Here are the key takeaways:
Systems Integration is Hard
Building a robotic hand isn't just about mechanical design or programming—it's about integrating multiple systems (computer vision, embedded control, mechanical actuation) into a cohesive whole. Each system has its own quirks, and getting them to work together smoothly requires patience and iterative refinement.
Kinematics is Your Friend
Understanding forward and inverse kinematics isn't just academic theory—it's essential for controlling robotic manipulators. The kinematic analysis I did for this project directly informed the control algorithm and made the finger movements much more accurate.
3D Printing is Iterative
3D printing is amazing for rapid prototyping, but it's not magic. Parts need post-processing, tolerances need adjustment, and sometimes you just have to print something three times before it works. Embrace the iteration—it's part of the process.
Real-Time Systems Require Optimization
When you're processing video at 30fps and controlling servos in real-time, every millisecond counts. I learned to profile my code, identify bottlenecks, and optimize critical sections. Sometimes the difference between smooth and jerky motion is just a few milliseconds of processing time.
Testing is Everything
You can't just build something and hope it works. Systematic testing—kinematic validation, stress analysis, gesture recognition accuracy—caught problems early and saved me from bigger issues later. Test early, test often, and test under realistic conditions.
What I'd Improve in Version 2
If I were to build this again (and I might), here's what I'd change:
Better Actuation System
The current tendon-based system works, but it has limitations. For version 2, I'd consider:
- Direct drive servos: Mount servos closer to joints for more direct control
- Pneumatic actuation: Soft robotics approach with pneumatic muscles
- Shape memory alloys: Compact actuators that could fit inside finger segments
Enhanced Sensing
Adding sensors would make the hand much more capable:
- Force sensors: In fingertips to detect contact and adjust grip strength
- Position encoders: On joints for closed-loop position control
- Tactile sensors: To detect object shape and texture
Improved Gesture Recognition
The current system works well but could be more robust:
- Machine learning classifier: Train a model to recognize specific gestures
- Multi-hand tracking: Support for both hands simultaneously
- Gesture library: Predefined gestures for common tasks (grasp, pinch, point, etc.)
Wireless Control
Eliminating the USB cable would make the system more portable:
- Bluetooth or Wi-Fi communication: Between computer and Arduino
- Battery power: Make the hand fully wireless
- Onboard processing: Raspberry Pi or similar for embedded gesture recognition
Better Materials
For a production version:
- Carbon fiber or metal: For critical structural components
- Flexible joints: Using compliant mechanisms instead of rigid joints
- Custom servo mounts: Optimized for the specific design
Advanced Control Algorithms
- PID control: For smoother, more accurate servo positioning
- Trajectory planning: Pre-planned motion paths for common gestures
- Adaptive control: Adjust grip strength based on object properties
Conclusion
Building this gesture-controlled robotic hand was one of the most rewarding projects I've undertaken. It combined mechanical design, computer vision, embedded systems, and control theory into a single, functional system. The hand isn't perfect—it's a prototype with limitations—but it works, and that's what matters.
The project taught me that robotics is about more than just building cool things. It's about understanding how systems work, how to integrate them, and how to iterate until you get it right. Every failed print, every debugging session, every calibration run was a learning opportunity.
And honestly? Watching a machine mirror your hand movements in real-time never gets old. It's like having a robot assistant that's always ready to lend a hand. Or in this case, five fingers.
If you're thinking about building something similar, my advice is simple: start with the basics, iterate often, test everything, and don't be afraid to fail. Because when it finally works, that moment makes all the challenges worth it.
Now, if you'll excuse me, I have a robotic hand that needs to learn how to hold a coffee cup. Fingers crossed it doesn't spill. 🤞☕